Why This Post Exists
I wanted to learn practical voltage fault injection on low-cost MCUs like WCH CH32V003 and Puya PY32.

What is Voltage Glitching?
Voltage glitching is a form of hardware fault injection where very short disturbances are introduced into a device's power supply. These disturbances can cause the CPU to skip instructions, misread memory, or bypass security checks. Researchers commonly use voltage glitching to study the robustness of microcontrollers and secure boot implementations.
The usual recommendation for conducting these attacks is the ChipWhisperer,
and yes, it is excellent. But in my reality, it is also expensive (close to 1L
INR) and often hard to source (sometimes effectively unobtanium in my region).
Pico Glitcher V2 (now V3) was the lifesaver.
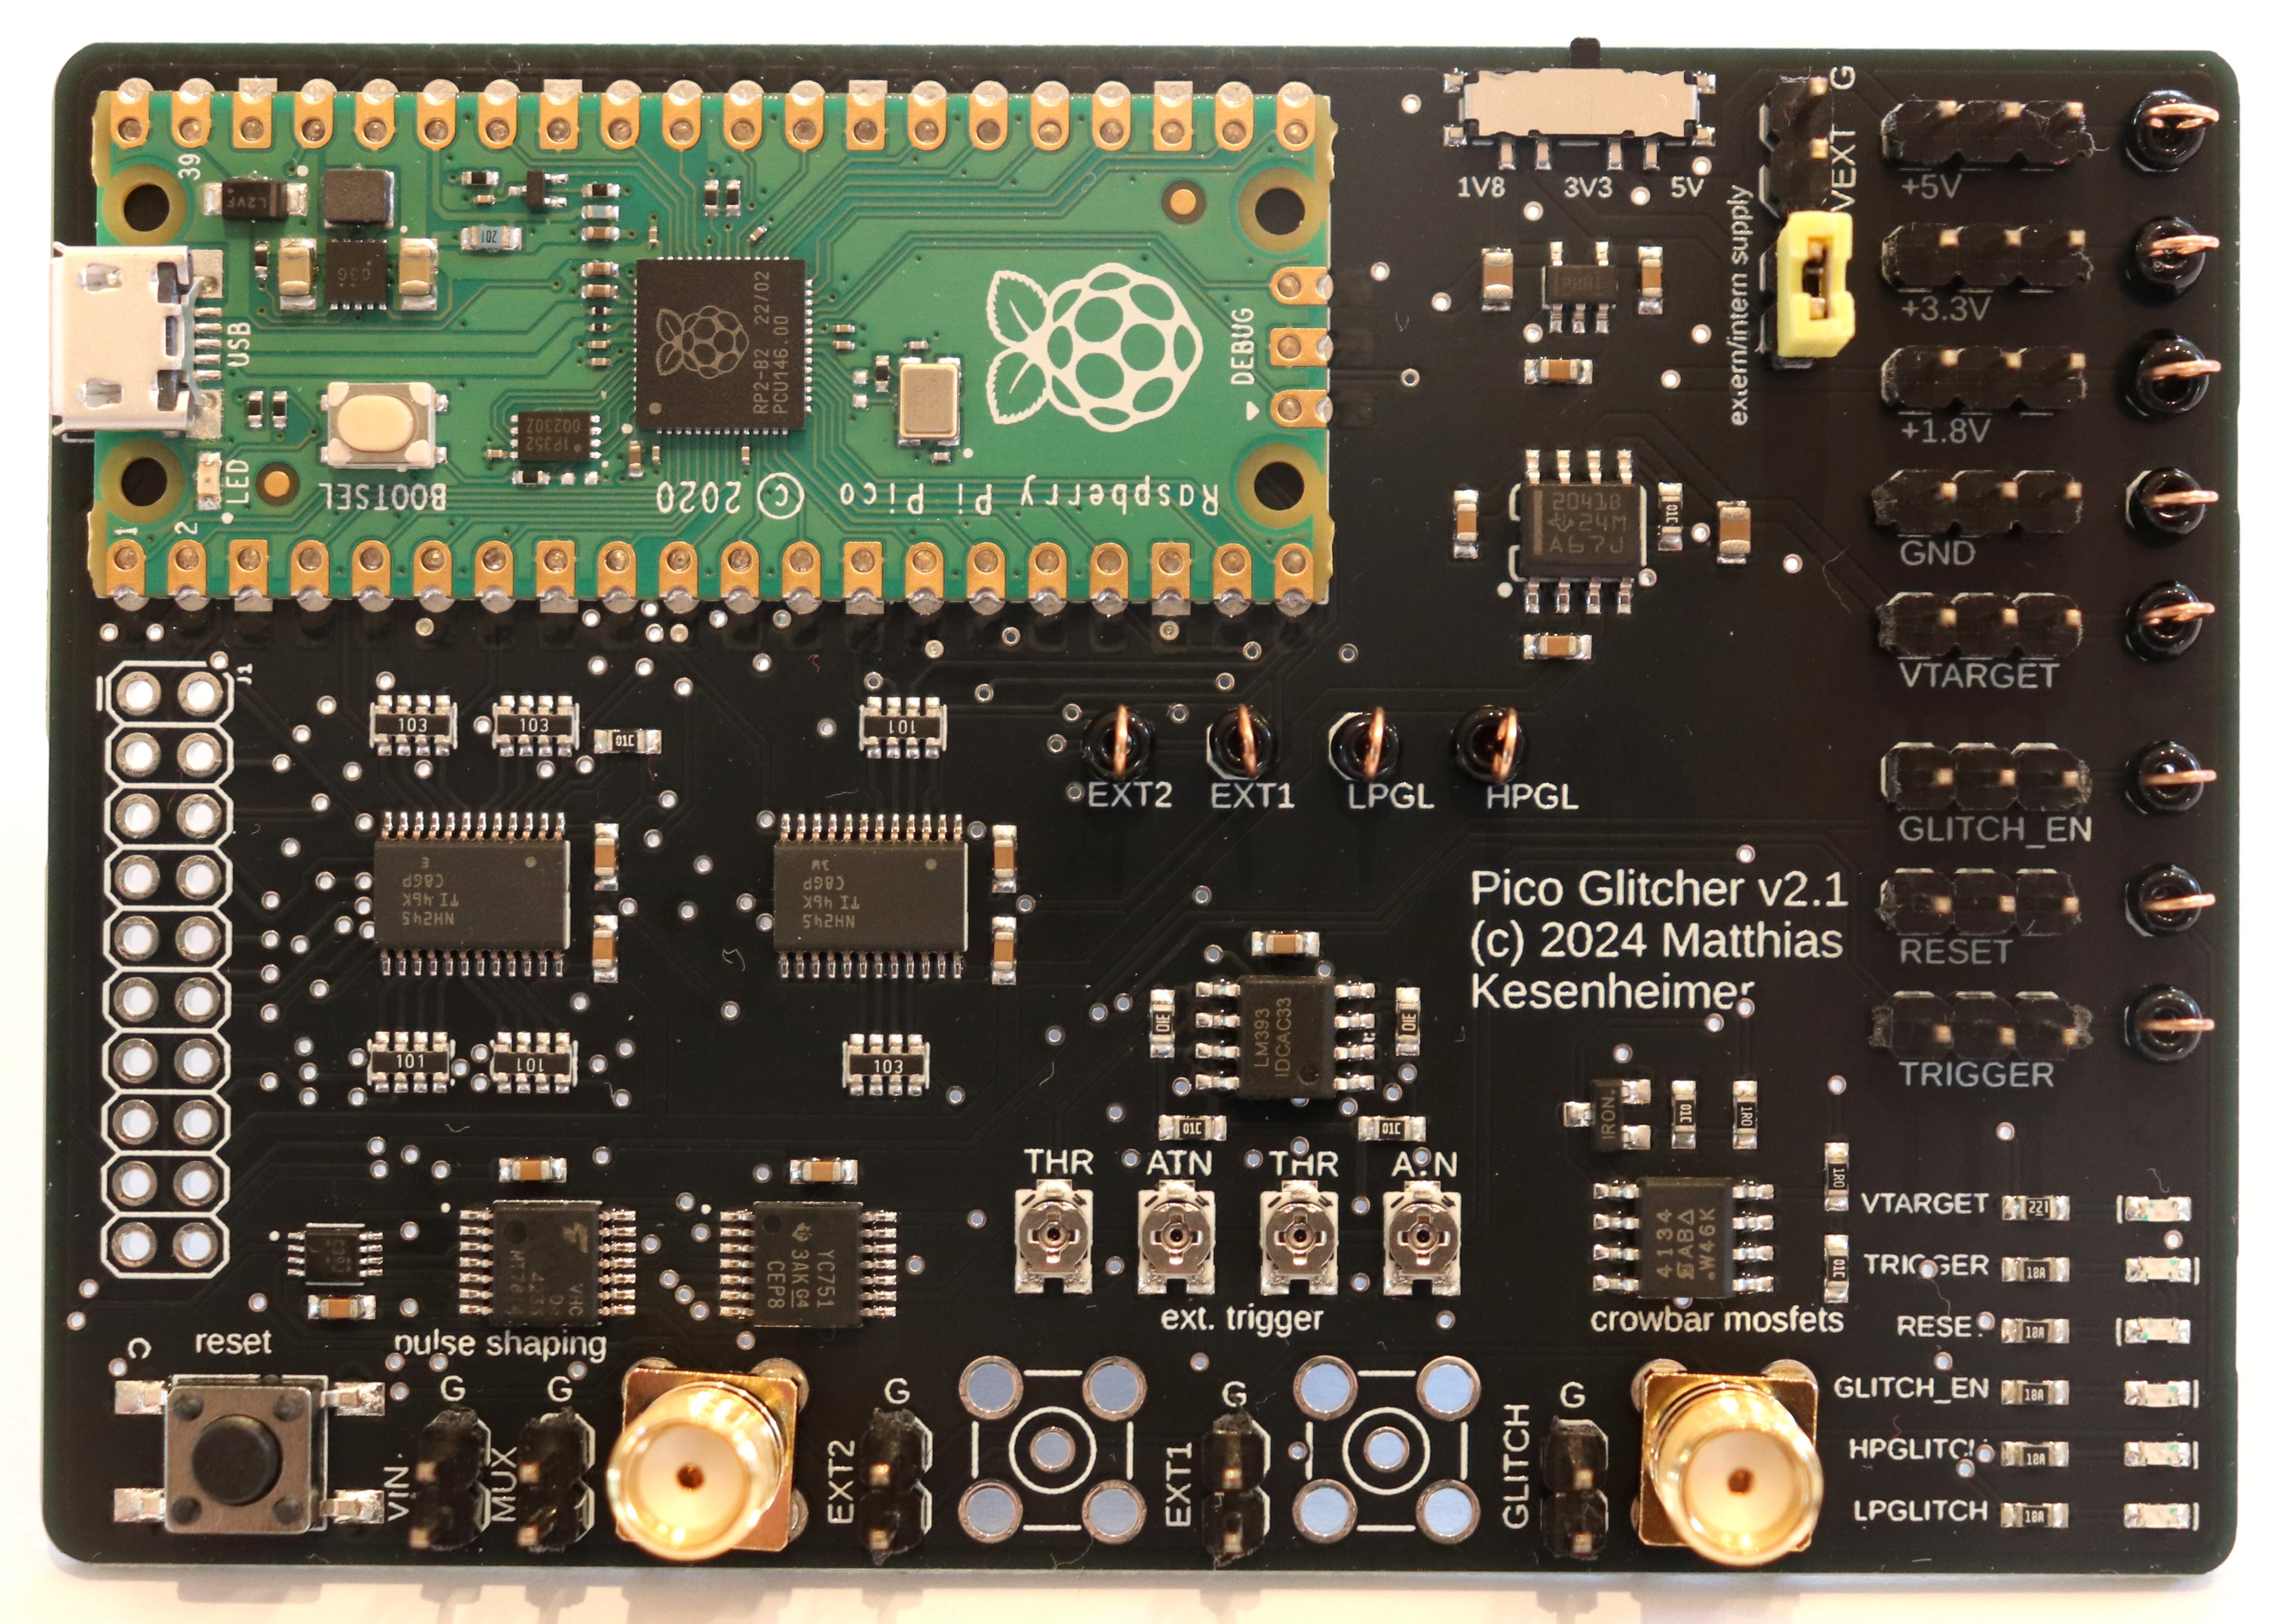
Affordable, available, hackable, and excellent enough to do real work.
Scope and Ethics
This work is done only on my own hardware, my own firmware, and my own test boards.
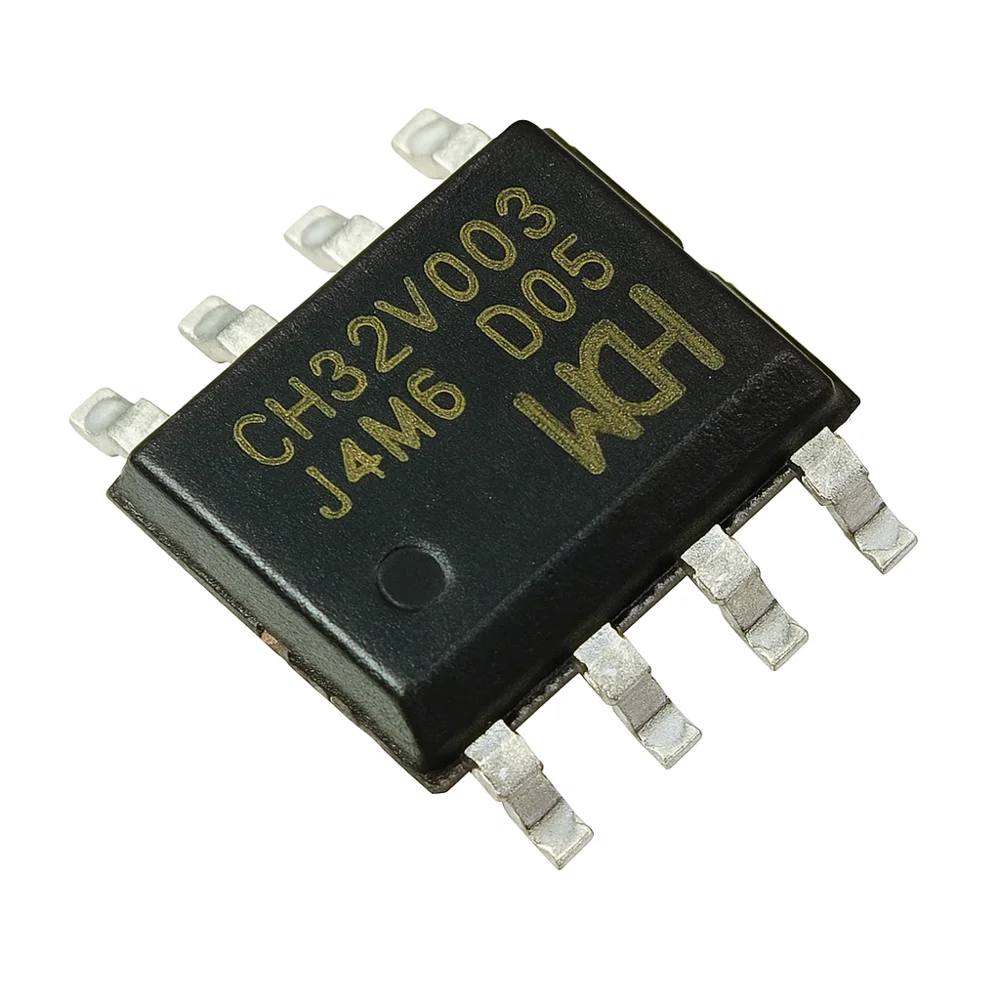
This experiment focuses on the WCH CH32V003 RISC-V microcontroller and the Puya PY32 ARM Cortex-M0+ microcontroller, both extremely inexpensive chips that are widely available.
Goal: Understand attack surfaces and improve embedded security.
Setup
My baseline lab stack:
Pico Glitcherfor fault injection timing and pulse generation- Targets: Bare WCH CH32V003 and Puya PY32 SOP-8 chips for easy glitching!
- GPIO trigger from firmware checkpoint
I started with a simple, reproducible target firmware:
- Boot
- Password check
- Branch to
successorfail
#include <stdint.h>
#include "ch32fun.h"

/*
 * CH32V003 (SOP-8) glitch-target demo for ch32fun.
 *
 * Default pins below are examples; change to pins actually broken out
 * on your SOP-8 board/wiring.
 *
 * PIN_TRIGGER: pulse before sensitive compare window
 * PIN_SUCCESS: high when glitch forces success path
 * PIN_FAIL:    high on normal fail path
 */
#define PIN_TRIGGER PC1
#define PIN_SUCCESS PC2
#define PIN_FAIL    PC4

static inline void delay_cycles(volatile uint32_t n) {
    while (n--) {
        __asm__ volatile("nop");
    }
}

static void gpio_init_simple(void) {
    funGpioInitAll();

    funPinMode(PIN_TRIGGER, GPIO_Speed_10MHz | GPIO_CNF_OUT_PP);
    funPinMode(PIN_SUCCESS, GPIO_Speed_10MHz | GPIO_CNF_OUT_PP);
    funPinMode(PIN_FAIL, GPIO_Speed_10MHz | GPIO_CNF_OUT_PP);

    funDigitalWrite(PIN_TRIGGER, FUN_LOW);
    funDigitalWrite(PIN_SUCCESS, FUN_LOW);
    funDigitalWrite(PIN_FAIL, FUN_LOW);
}

/*
 * Intentionally glitchable control-flow check (demo only).
 * Keep this in lab firmware only.
 */
static int auth_check(uint32_t input) {
    volatile uint32_t secret = 0xA55A1234u;
    volatile uint32_t s1 = 0;
    volatile uint32_t s2 = 0;

    /* Trigger marker for PicoGlitcher/scope timing anchor */
    funDigitalWrite(PIN_TRIGGER, FUN_HIGH);
    delay_cycles(200);
    funDigitalWrite(PIN_TRIGGER, FUN_LOW);

    if ((input ^ 0x11111111u) == (secret ^ 0x11111111u)) {
        s1 = 1;
    }

    delay_cycles(700);

    if ((input + 7u) == (secret + 7u)) {
        s2 = 1;
    }

    return (s1 && s2) ? 1 : 0;
}

int main(void) {
    SystemInit();
    gpio_init_simple();

    /* Wrong on purpose; glitches try to flip branch outcome. */
    volatile uint32_t guess = 0xDEADBEEFu;

    while (1) {
        int ok = auth_check(guess);

        if (ok) {
            funDigitalWrite(PIN_SUCCESS, FUN_HIGH);
            funDigitalWrite(PIN_FAIL, FUN_LOW);
            delay_cycles(220000);
            funDigitalWrite(PIN_SUCCESS, FUN_LOW);
        } else {
            funDigitalWrite(PIN_FAIL, FUN_HIGH);
            funDigitalWrite(PIN_SUCCESS, FUN_LOW);
            delay_cycles(60000);
            funDigitalWrite(PIN_FAIL, FUN_LOW);
        }

        /* Inter-attempt gap for clean captures */
        delay_cycles(250000);
    }
}
$ git diff
diff --git a/examples/blink/Makefile b/examples/blink/Makefile
index 7107cf3..ecb622e 100644
--- a/examples/blink/Makefile
+++ b/examples/blink/Makefile
@@ -3,9 +3,10 @@ all : flash
 TARGET:=blink

 TARGET_MCU?=CH32V003
+# Bare CH32V003 without external crystal: force internal HSI clock source.
+EXTRA_CFLAGS += -DFUNCONF_USE_HSI=1 -DFUNCONF_USE_HSE=0 -DFUNCONF_HSE_BYPASS=0
...

$ pwd
~/repos/ch32fun/examples/blink
This made it easy to detect whether a glitch changed control flow.
Methodology (What Actually Matters)
Voltage glitching is mostly about discipline, not magic.
I systematically swept three core parameters:
- Glitch offset (when to inject)
- Glitch width (how long)
- Glitch amplitude/depth (how hard)
For each parameter set, I ran repeated trials and labeled outcomes:
- Normal boot
- Reset/hang
- Faulted behavior (interesting)
- False positive
Then I plotted success-rate heatmaps. Without data, glitching turns into superstition.
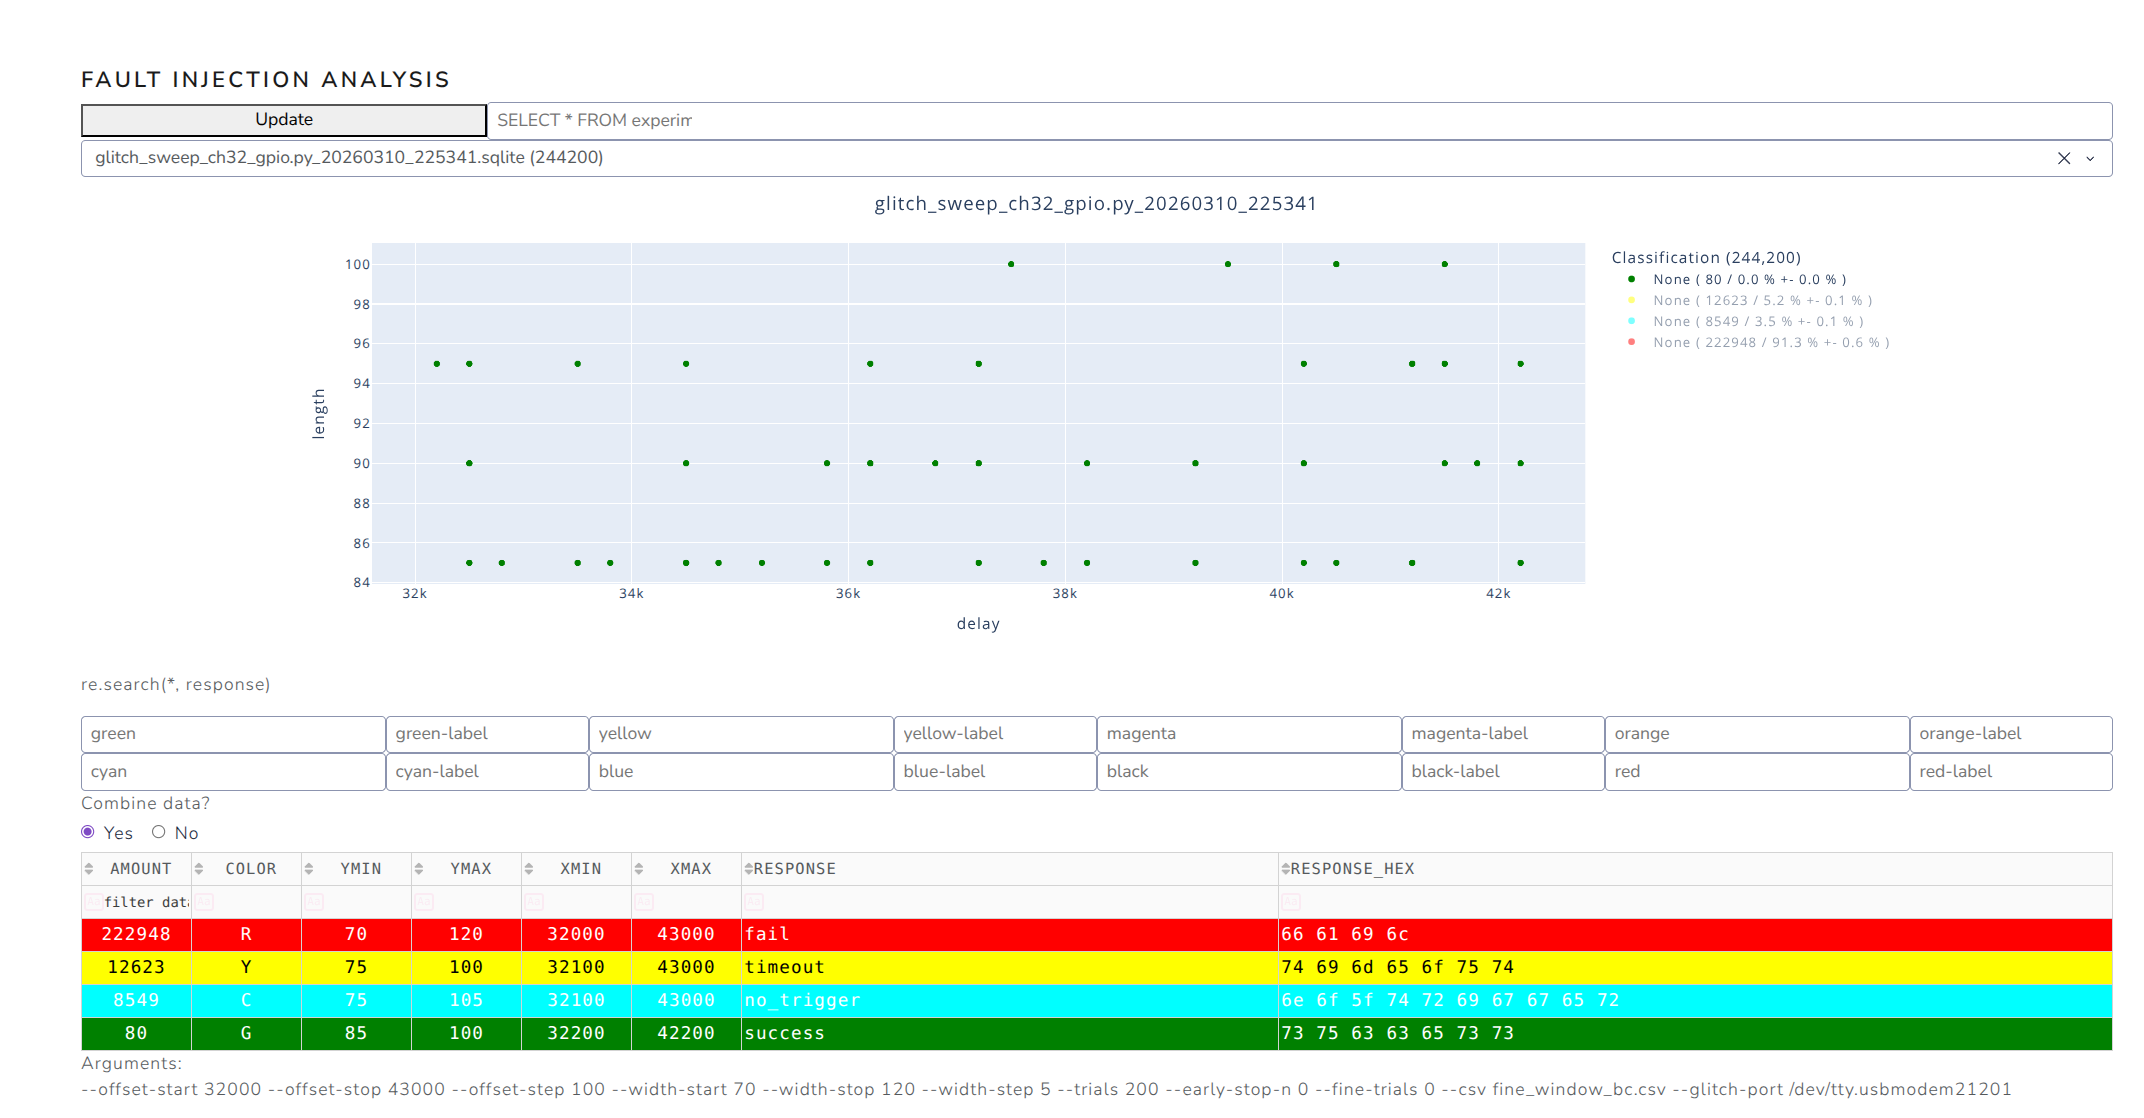
Success!
To the best of my knowledge, this may be the first publicly documented glitching experiment targeting the CH32V003 family.
$ python3 glitch_sweep_ch32_gpio.py --trials 3200000 --status-every-s 1 --status-every-trials 100
[+] Starting sweep script...
[+] Connecting to Pico Glitcher on /dev/ttyACM0...[+] Version of Pico Glitcher: [1, 13, 1]
[+] Version of findus: [1, 13, 1]
 Done.
[+] Initializing database (resume=False)... Done. (Database: glitch_sweep_ch32_gpio.py_20260309_123807.sqlite [Fast Mode])
[i] Approx upper-bound per trial: 0.140s (one coordinate worst-case: 124h26m40s)
[+] Opening CSV for results: ch32v003_glitch_sweep.csv
[*] Testing offset=   1 width=  20 (3200000 trials)
[.] 10/3200000 (  0.00%) rate=   9.3/s eta=95h40m53s ok=0 fail=10 reset=0 timeout=0 noTrig=0 commErr=0
[.] 19/3200000 (  0.00%) rate=   8.9/s eta=99h42m30s ok=0 fail=19 reset=0 timeout=0 noTrig=0 commErr=0
[.] 28/3200000 (  0.00%) rate=   8.8/s eta=101h08m25s ok=0 fail=28 reset=0 timeout=0 noTrig=0 commErr=0
[.] 37/3200000 (  0.00%) rate=   8.7/s eta=101h52m44s ok=0 fail=37 reset=0 timeout=0 noTrig=0 commErr=0
...
Why Pico Glitcher Helped So Much
What made Pico Glitcher practical for me:
- Low cost, so I could actually buy and use it
- Simple scripting and rapid iteration
- Easy integration with a budget bench setup
- "Good enough" timing control to find real fault windows
For learning + meaningful MCU fault research, it absolutely delivers.
The glitching setup
Yes, the jumper cables could have been a lot shorter (and twisted), the mini-breadboard could have been avoided and so on - all with some more attention and TLC.
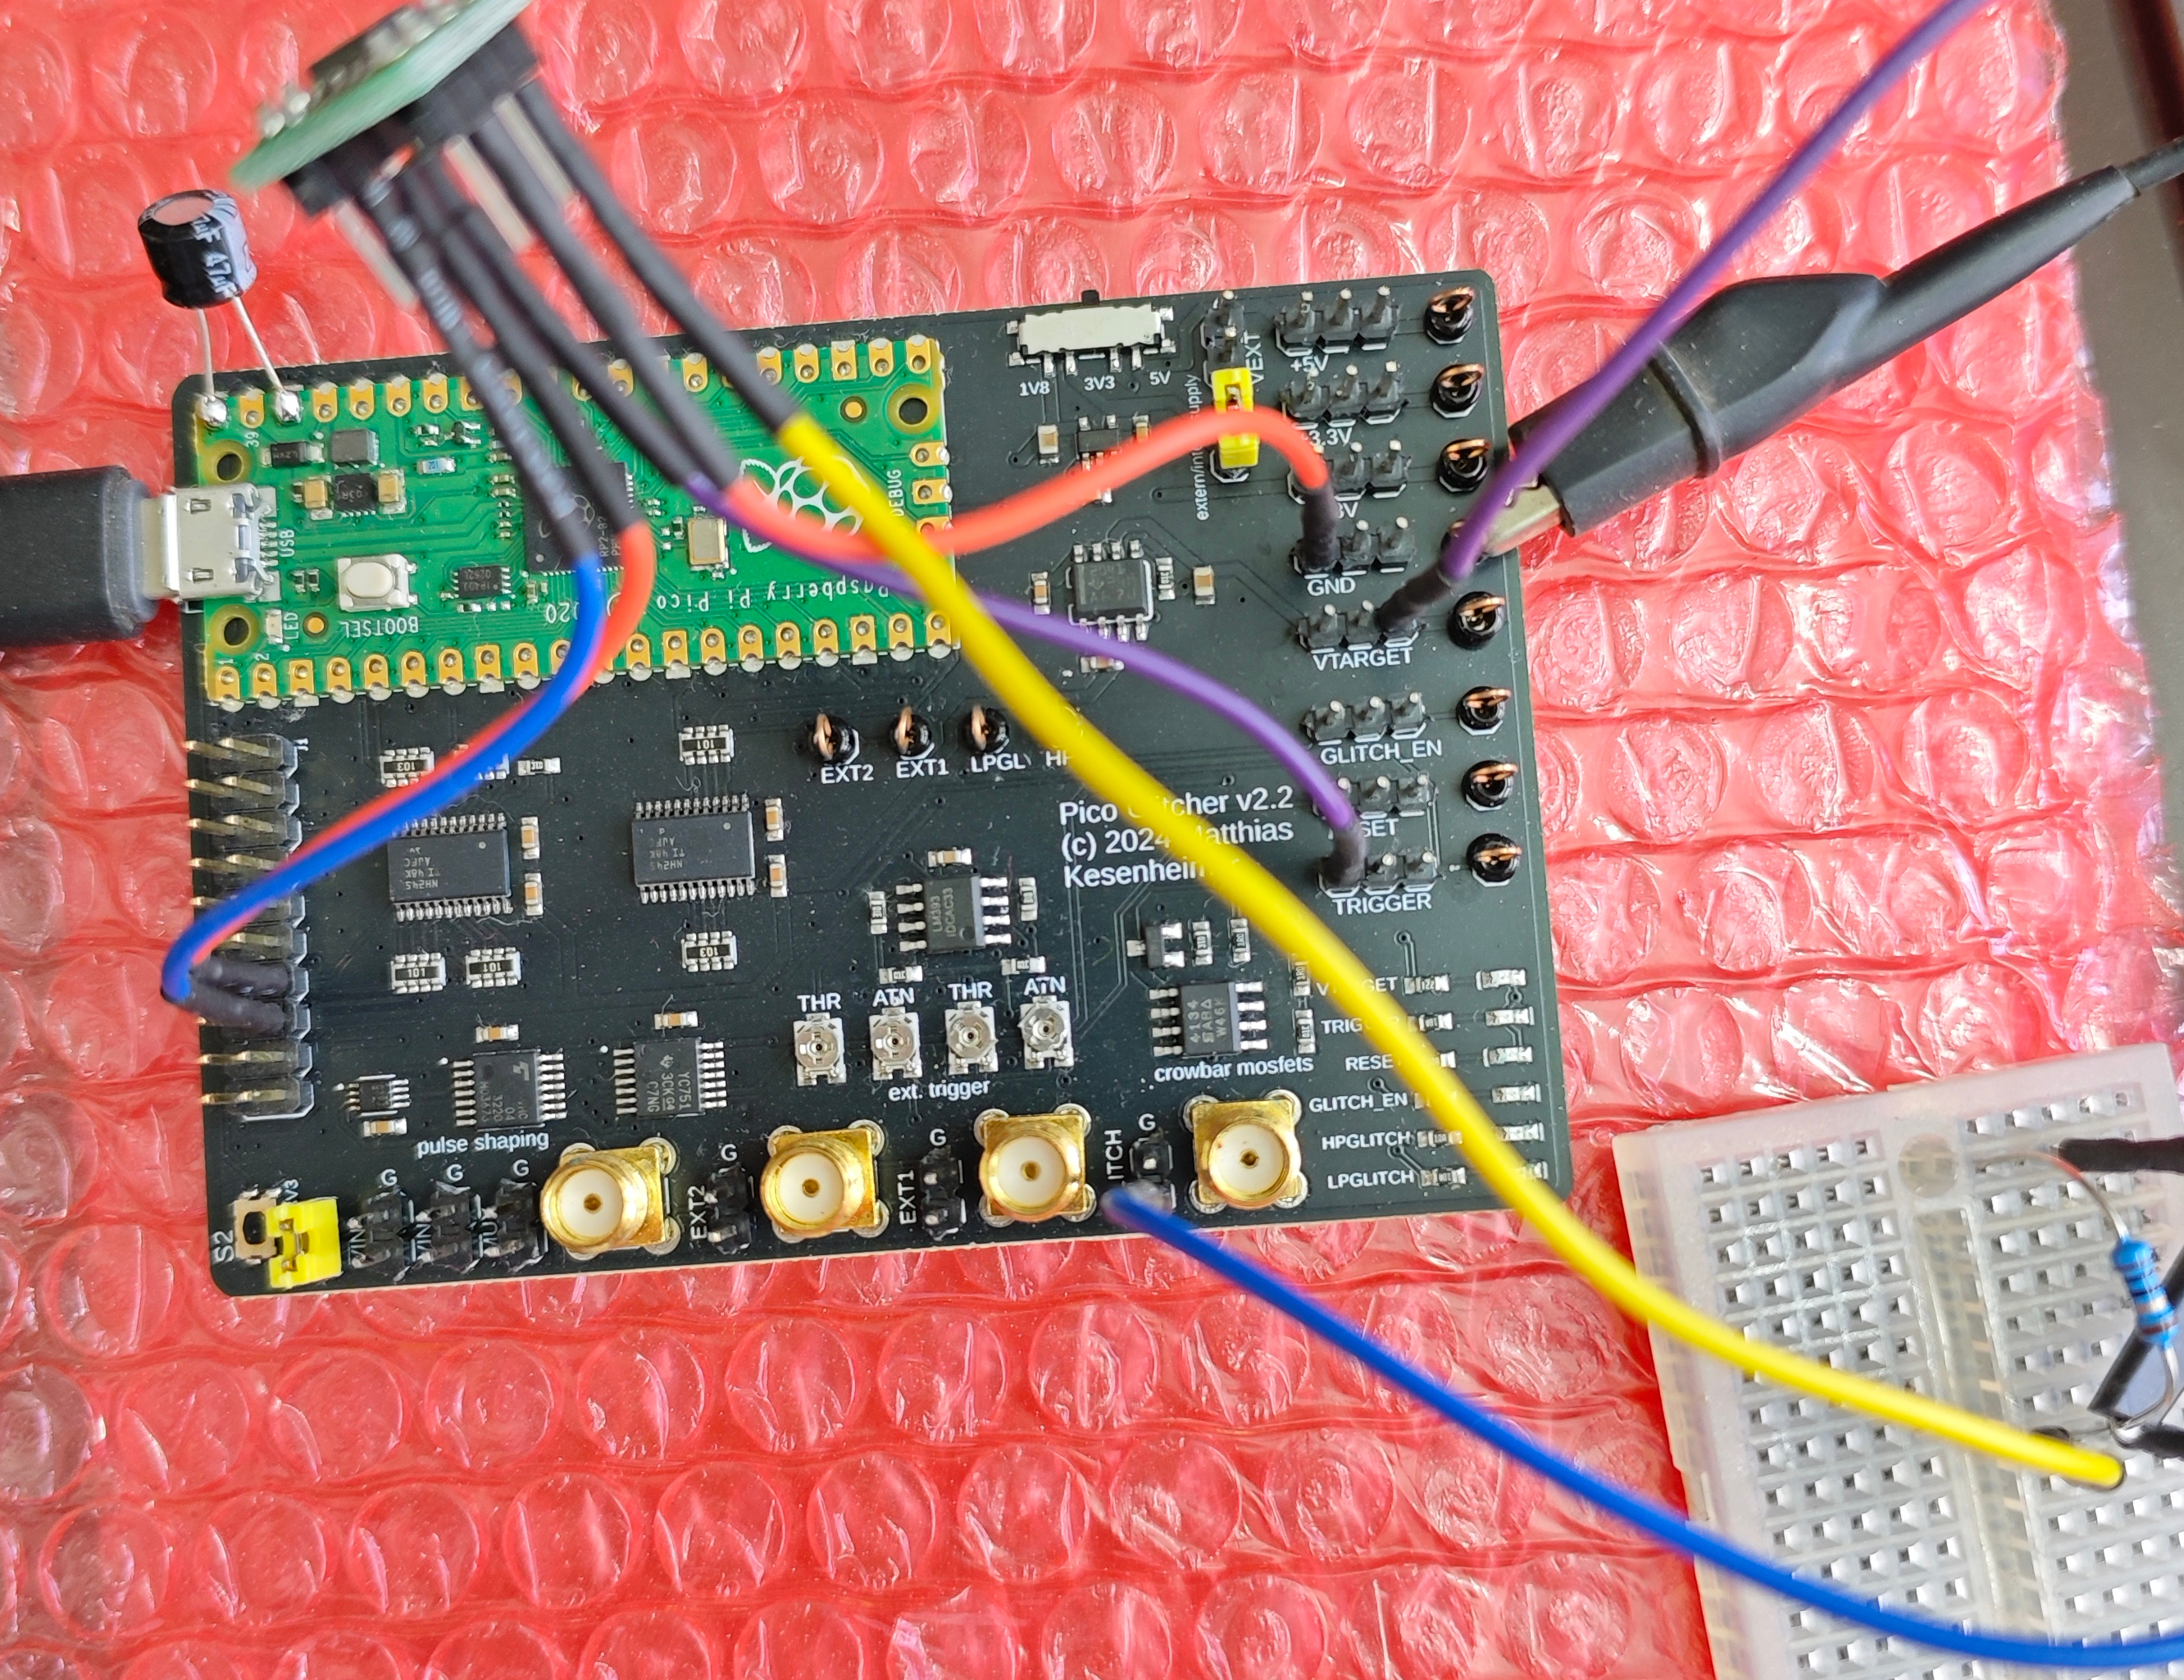
This directly follows from the glitching setup described here.
Connections:
                  +----------------------+
                  |    Pico Glitcher     |
                  |      v2.x board      |
                  |                      |
                  | [VTARGET] ---+-------+------> 10 Ω resistor ->--+------> VTG line
                  |                      |                          |
                  | [GLITCH] ---+---------------> Glitch line ------+
                  |                      |
                  +----------------------+

+--------------------------------------------------+
|                  Target breadboard               |
|                                                  |
|   +-------------------+                          |
|   |     MCU           |  <-- MCU on breakout     |
|   +-------------------+                          |
|        |     |                                   |
|       VDD   GND                                  |
|        |     |                                   |
|   -----+---+-------------------------------------|
|        |     |                                   |
|        |     |                                   |
|        |     |                                   |
|   VTG line  Common GND                           |
+--------------------------------------------------+
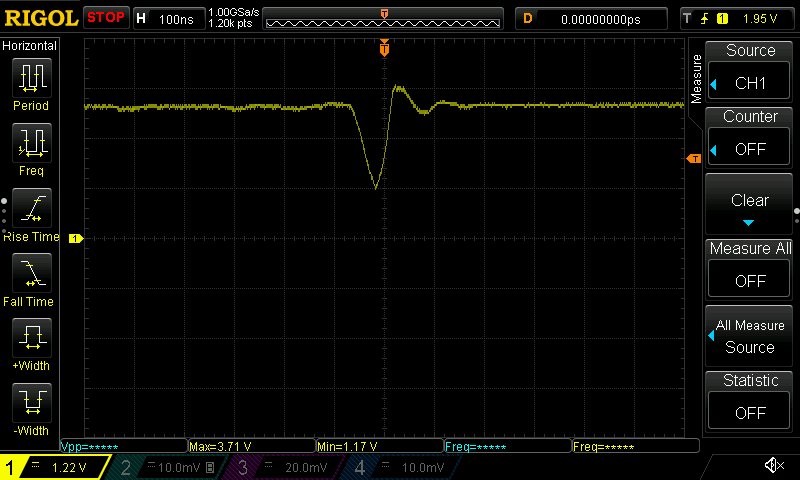
Oscope screen capture:
$ echo ":DISPLAY:DATA? ON,OFF,PNG" | nc -w1 192.168.1.32 5555 | dd bs=1 skip=11 of=scope.png

$ lxi screenshot -a 192.168.1.32 -p rigol-1000z scope-2.png  # alternate from 'lxi-tools' package
Early Results
On CH32V003, I observed narrow timing windows where behavior changed under controlled glitches. Most attempts still fail (as expected), but that is normal for real glitch work.
The key lesson: repeatability > lucky hits.
Each configuration was tested across thousands of trials to avoid mistaking random resets for successful glitches.
Cost/Access Reality Check
Security tooling should not be gated behind high prices and supply-chain luck. Open and affordable tools are critical for independent researchers.
For me, Pico Glitcher converted "I should learn this someday" into "I can test this today."
Gotchas
We could NOT get Pico Glitcher to work on our ASUS ROG Zephyrus G14 laptop
running Ubuntu Linux 25.10 (AMD64). The python pico-glitcher.py --rpico /dev/ttyACM0 --delay 0 0 --length 100 100 would hang within a minute.
Pico Glitcher worked perfectly on a Mac Mini M4 machine, which is where we
had to run our glitching experiments.
Investigation of this problem
We created a light-weight Ubuntu VM to test Pico Glitcher on the same
problematic Linux laptop.
sudo apt-get install qemu-system-x86 cloud-image-utils -y

wget https://cloud-images.ubuntu.com/noble/current/noble-server-cloudimg-amd64.img

qemu-img create -f qcow2 -F qcow2 -o backing_file=noble-server-cloudimg-amd64.img my-vm.qcow2 128G
echo -e "#cloud-config\nusers:\n  - name: ubuntu\n    ssh-authorized-keys:\n      - $(cat ~/.ssh/id_rsa.pub)\n    sudo: ['ALL=(ALL) NOPASSWD:ALL']" > user-data

echo -e "instance-id: my-vm\nhostname: my-vm" > meta-data

cloud-localds seed.iso user-data meta-data

$ lsusb -d 2e8a:0005
Bus 001 Device 015: ID 2e8a:0005 MicroPython Board in FS mode
$ cat launch.sh
qemu-system-x86_64 \
  -machine q35 \
  -cpu host \
  -enable-kvm \
  -m 8G \
  -smp 4 \
  -drive file=my-vm.qcow2,format=qcow2 \
  -cdrom seed.iso \
  -net nic -net user,hostfwd=tcp::2222-:22 \
  -device qemu-xhci,id=xhci \
  -device usb-host,hostbus=1,hostaddr=15
ssh -p 2222 ubuntu@localhost
Follow https://fault-injection-library.readthedocs.io/en/latest/getting_started/ inside the VM.
$ uname -a
Linux ubuntu 7.0.0-rc3 #5 SMP PREEMPT_RT Thu Mar 12 03:19:57 UTC 2026 x86_64 x86_64 x86_64 GNU/Linux

(.venv) ubuntu@ubuntu:~/my-fi-project$ python pico-glitcher.py --rpico /dev/ttyACM0 --delay 0 0 --length 100 100[+] Version of Pico Glitcher: [1, 13, 1]
[+] Version of findus: [1, 13, 1]
[+] Experiment 0	0	(NA)	100	0	G	b'Trigger ok'
[+] Experiment 1	0	(1)	100	0	G	b'Trigger ok'
[+] Experiment 2	0	(2)	100	0	G	b'Trigger ok'
[+] Experiment 3	0	(3)	100	0	G	b'Trigger ok'
[+] Experiment 4	0	(4)	100	0	G	b'Trigger ok'
[+] Experiment 5	0	(5)	100	0	G	b'Trigger ok'
[+] Experiment 6	0	(6)	100	0	G	b'Trigger ok'
[+] Experiment 7	0	(7)	100	0	G	b'Trigger ok'
[+] Experiment 8	0	(8)	100	0	G	b'Trigger ok'
[+] Experiment 9	0	(4)	100	0	G	b'Trigger ok'
[+] Experiment 10	0	(5)	100	0	G	b'Trigger ok'
[+] Experiment 11	0	(5)	100	0	G	b'Trigger ok'
[+] Experiment 12	0	(6)	100	0	G	b'Trigger ok'
[+] Experiment 13	0	(6)	100	0	G	b'Trigger ok'
[+] Experiment 14	0	(7)	100	0	G	b'Trigger ok'
[+] Experiment 15	0	(7)	100	0	G	b'Trigger ok'
[+] Experiment 16	0	(8)	100	0	G	b'Trigger ok'
[+] Experiment 17	0	(8)	100	0	G	b'Trigger ok'
...
<Goes on just fine>
What's Next
Trying this approach on more complex MCUs and secure boot targets.
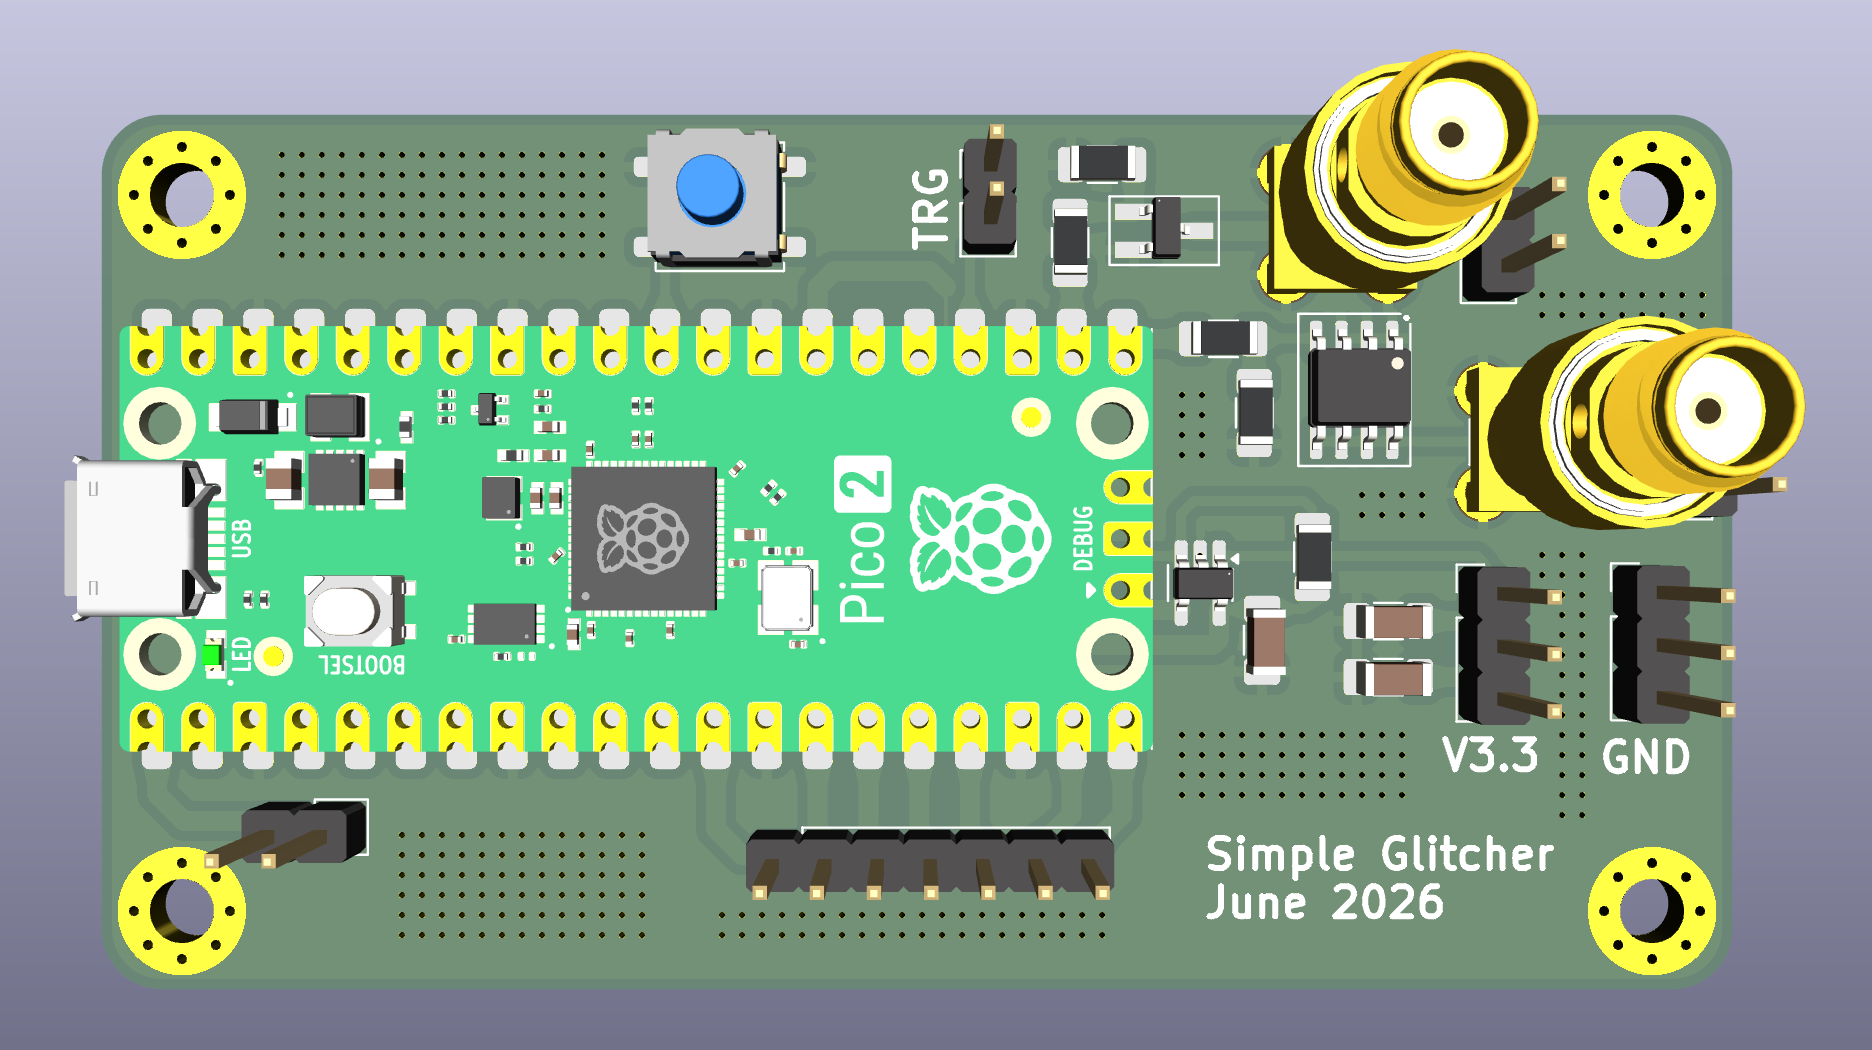
I am also tempted to build my own findus-compatible glitching hardware board
using RPi Pico 2 for 3.3V targets (as a starting point). Our initial board will
be more than 1000X (thousand times) cheaper than the ChipWhisperer-Husky Starter Kit.
Future‑me will probably regret promising a 1000×‑cheaper Husky "competitor" in public, but here we are.
Update (June-2026):
References
IRLML2030TRPBF - INFINEON - The best MOSFET for low power glitching?
https://fault-injection-library.readthedocs.io/en/latest/getting_started/
https://github.com/cnlohr/ch32fun (awesome stack for 'ch32')
https://github.com/IOsetting/py32f0-template (the best 'sdk' for PY32)
https://github.com/kholia/avr-glitch-101 - My earlier AVR glitch toy project ("under-glitching" technique!)